Pose Editing
Pose a character in the Scene view with real handles, and key the result back into the clip. No play mode, no recording button, no risk to your prefabs.
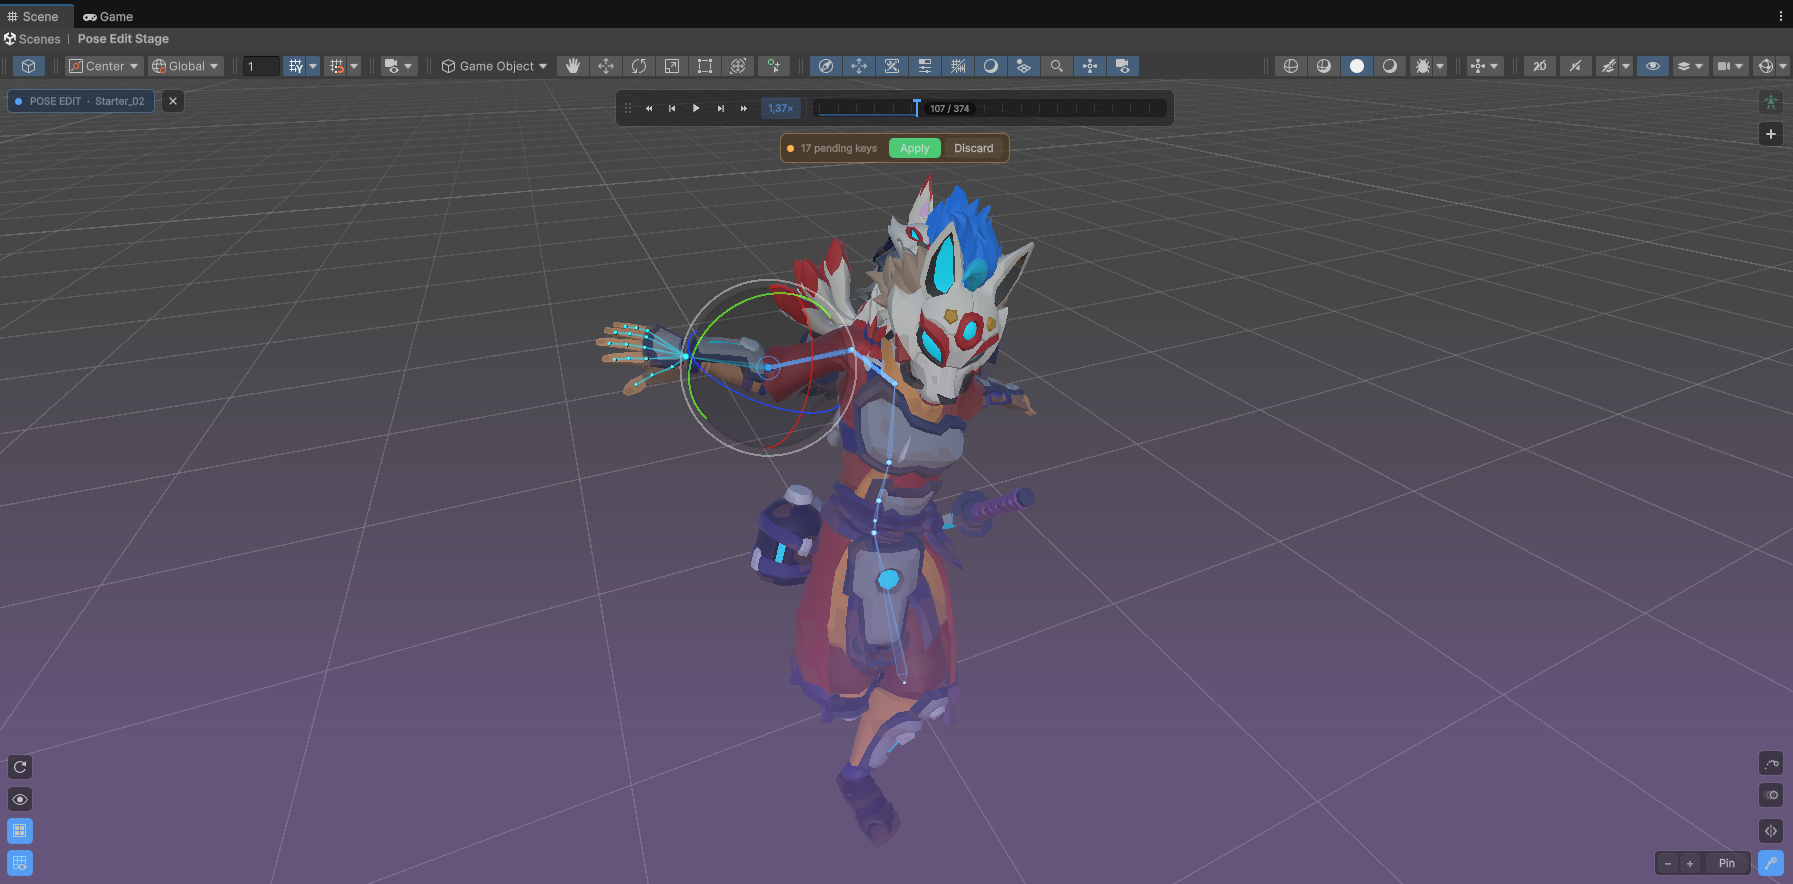
Two ways in
| Mode | Shortcut | You pose on |
|---|---|---|
| Pose Edit | Ctrl+L | A temporary stage character |
| Scene Edit | Ctrl+Shift+L | A character in your open scene |
Pose Edit is the default: a stage character appears, isolated and well lit, with nothing else in the way.
Scene Edit is for when the surroundings are the point - a climb that has to line up with the actual wall, a pickup that has to reach the actual crate. Have the clip open in the Keyframe Editor, select the character in your scene, press the key.
With nothing usable selected it places the character for you rather than refusing: the button reads Scene Edit +, and the clip's own character appears in the middle of your view. That figure is yours from then on - it stays when the session ends, and Ctrl+Z removes it. Only a clip with no character that fits leaves the button grey, and the hotkey says so instead of doing nothing.
Either way, edits are keyed into the clip. The rig is never modified.
The scene HUD
A fixed HUD frames the Scene view - deliberately not a Unity Overlay, so it stays exactly where you expect it:
- Top left - the session badge, naming the character you are posing, with the exit button
- Top centre - the transport bar: playback, frame stepping, speed and the current frame. Under it, the pending pill
- Bottom left - view toggles: mesh, grid, camera
- Bottom right - the tool chips (Mirror, IK, Onion Skin, Motion Trail) with their flyouts, and the pin control
Pending changes
Your edits are pending until you commit them. The pill under the transport bar counts them - "17 pending keys" - and carries the two buttons that resolve them.
| Action | Default |
|---|---|
| Apply pending changes | Ctrl+Space |
| Discard pending changes | Backspace |
This is why you can pose across a frame change without losing work, and why switching the preview character asks you to resolve pending edits first - the new character has different bones and would drop them.
Selecting bones
The bone overlay draws the skeleton over the character - octahedral bones or joint spheres, your choice in Settings.
Click a bone to select it. Drag in empty space for a marquee and select several at once. While Pose Edit is running, the empty space belongs to the marquee rather than to Unity's own object picking - that is what makes rectangle-selecting bones possible at all.
FK, IK and Grab
Tab cycles the three.
FK rotates and translates a single bone with the standard Unity handles. W / E / R switch between Move, Rotate and Scale.
IK drags an end effector and lets the chain follow. The chain length is adjustable on the fly: + extends it up the hierarchy, - shortens it, and the scroll wheel does both while the pointer is on the chain or its gizmo - during the drag as well, the same way it sets the pull depth in Grab. A longer chain means the spine joins in; a shorter one keeps the motion in the arm.
Grab takes hold of the mesh itself.
Grab
Press anywhere on the skin and pull. The spot you grabbed follows the mouse, and the bones behind it bend to keep up. No bone to select first and no gizmo to aim at: the middle of a forearm is a grab point although no joint sits there.
The chip's icon says which of the two you are in. The ring sits on the tip of the chain for IK, and in the middle of a bone for Grab.
Hovering shows what a press would take: the point, the bone that drives it, and the chain that would move. Worth a glance around shoulders and hips, where the surface belongs to two bones at once and a few pixels decide which one you get.
The scroll wheel sets how deep the pull reaches. One bone bends only the joint you grabbed; six bring half the spine along. It works during the pull as well, which is when the number means something - you can watch the back bend too far and take it back without letting go.
Shift with the wheel moves the grabbed point toward or away from the camera. The mouse has two axes and a pose has three, so without it a hand can only travel across the screen and never into it. Alt with the wheel stays the camera zoom.
The pull stops at the hips. Above them every bone carries the whole figure, so a solve there would swing the character rather than bend a joint - move the character with the FK handle instead. Pins hold during a grab, but they are set in IK mode, since the grab has no selected chain to pin.
2D characters made of SpriteRenderers are grabbed by their sprites. Which one you get follows the draw order, the sprite on top wins, and the pull moves the joint the sprite hangs on - in a cutout rig where each picture sits under a bare joint transform, that is the joint, not the picture. The pull stays in the picture plane, so Shift with the wheel does nothing there. Sprites deformed by the 2D Animation package (Sprite Skin) cannot be grabbed yet.
Grab is marked beta. The poses it writes are ordinary keys like any other; what is still being tuned is how it feels.
Pinning
P pins the active IK chain in world space. A pinned hand stays where it is while you move the rest of the body - which is exactly what you want for foot plants and contact points.
Shift+P moves the pin's anchor to the current pose, for when you got the hand where it should be and now want it to stay there.
Bone Lock
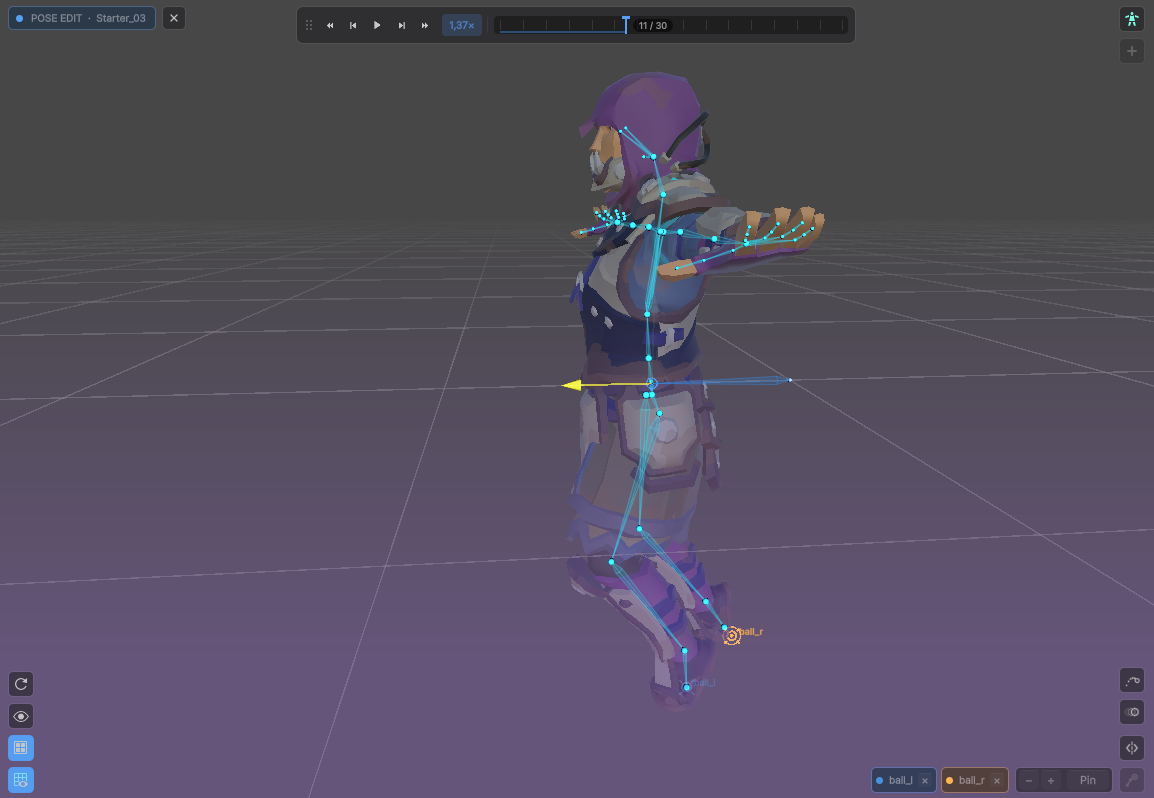
A pin holds a chain for the length of one drag. Bone Lock holds it across a stretch of the clip, so a foot can stay planted while the walk keeps running over it.
Select the bones, then press one of the two on the Bone Lock chip:
| What it holds | |
|---|---|
| Hold | The selected bone stays where it was when the lock started. Foot plants, a hand on a railing. |
| Freeze | The selected bones stay where they were, while everything hanging off them keeps its own motion. A torso that stops turning while the arms carry on. |
A lock holds the bones you selected, and nothing else. Neither one reaches for the IK chain the bone happens to sit on any more.
Hold keeps one bone in place, and it gets there by folding the joints above it - a foot stays planted because the knee and hip bend around it. Those joints are the mechanism, not the lock: the scene marks the held bone, the chip names it, and the tooltip says which joints will do the folding. What comes out is still one layer you can mute.
Folding needs two joints above the bone, which is why Hold wants a limb under it. Select a calf or a forearm and it says so rather than running: with a single joint the chain can only swing, and the bone travels with the body anyway. Freeze works on any single bone.
Then scrub. The correction is there from the first frame and you watch it happen - the lock ends wherever you stop, and Keep writes it. x drops it and the original motion comes back with nothing written.
How much of it to keep
Weight, over the buttons, is how strongly the lock pulls. It moves the running preview, so the figure answers while you drag it: at 100% the bone is welded in place, and lower lets it drift with the motion underneath, which is often what reads as a plant rather than a nail. Whatever the slider says when you press Keep is what the layer gets.
It starts on the weight the lock layer of that kind already has, so a layer you dialled down stays dialled down when you lock the next chain into it.
Adding bones as you go
While a lock runs, Hold and Freeze give way to Add. Select another bone, press it, and it joins the lock that is already running - same start, same end, same anchor. The window is re-solved with the wider set, so the result is what you would have got had you selected both from the beginning.
That is how a lock that turned out too stiff or too loose gets fixed: one bone at a time, watching each one land, instead of dropping the gesture and starting over.
Freeze takes any bone. Hold reads the selection two ways. A bone above the chain lends the solve another joint to fold with - the anchored bone does not change, it just gets more reach. A bone somewhere else entirely becomes a second anchor: plant the right foot, select the left, press Add, and both are held in the same window and land in the same layer. What Hold still refuses is a bone below what it anchors, because the anchor is what the whole correction is measured against.
The ring in the scene marks where a held bone is being held, not where it currently is. As long as the two sit on top of each other the lock is doing its job; if the bone drifts out of its ring, the chain cannot reach that far and wants another joint via Add.
That is the whole gesture: there is no separate bake step and no second click to mark the end. You reach the end rather than guessing it.
What Keep writes is an additive layer masked to the bones the lock touched, named after what it holds (Hold: Left Leg), playing at the weight you set. Muting or deleting that layer brings the untouched motion back. Starting another lock on the same chain takes the existing layer over instead of leaving two side by side.
Both work on Humanoid and generic rigs.
Mirror
Shift+Tab cycles the mirror modes:
| Mode | Effect |
|---|---|
| Symmetric | The mirrored side takes the symmetric pose - a mirror image |
| Mirrored rotation | The same rotation is applied to both sides |
For humanoid rigs the bone pairs come from the avatar. For generic rigs they are matched by naming convention, with a set of common L/R patterns.
Motion trail
Ctrl+T shows the path a joint travels over the clip, so an arc that dips where it should sweep becomes visible without scrubbing back and forth. Shift+T locks the trail to the current bone so it stays on the joint you care about while you work elsewhere.
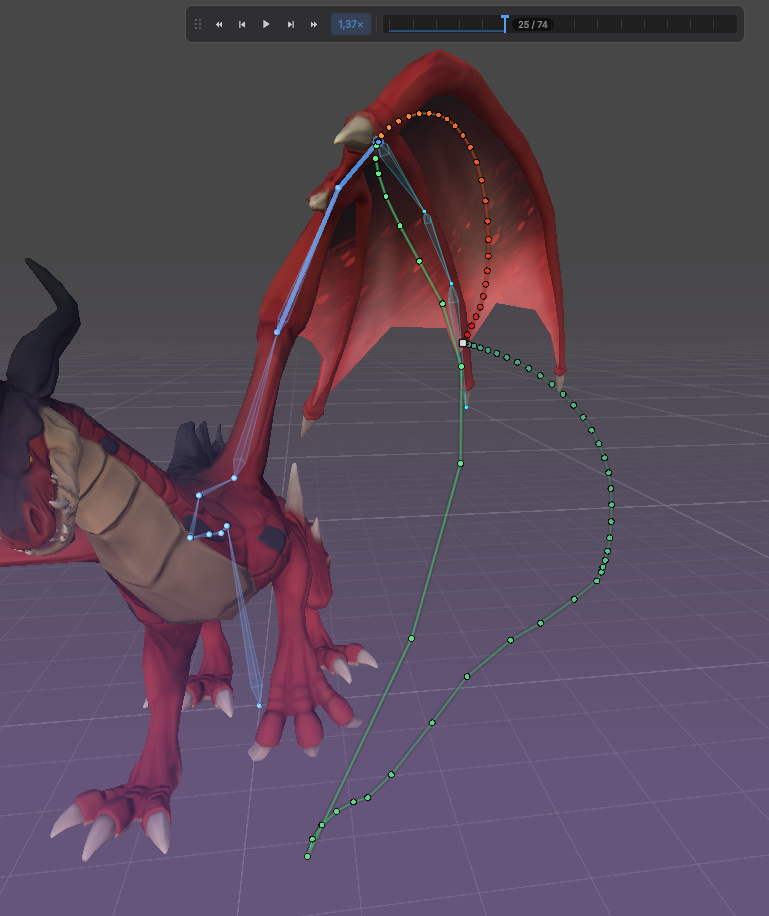
One dot per frame, so the trail carries the timing as well as the shape: dots bunching up mean the joint is slowing down there, whether or not you wanted it to.
Onion skinning
Ghosts of neighbouring frames, from the tool chips in the HUD. Same idea as in the dope sheet, but in the scene where you are actually posing.
Props
A sword in the hand, a shield on the back, a bow the character is drawing. A prop is scenery you pose against: it hangs off a bone, rides along with every sample, and never becomes part of the clip.
Attaching one
Drag a prefab from the Project window onto a bone. There is no button for it - while a prefab hangs over the character a pill follows the cursor and names what would happen, which is the moment you find out the gesture exists at all. Drop it on a bone and a notification says where the assignment went:
SM_Prop_Bow_Rigged → RightHand · all humanoid rigs
The bone decides that, exactly as it does for bone slots:
| The bone you dropped on | Where the assignment lives |
|---|---|
| One the avatar knows (humanoid rig) | Shared - the prop hangs on every humanoid character from then on |
| A generic rig, or a bone outside the avatar | This character |
Ctrl+Z takes an attach or a removal back - until you pose a bone again. From there the undo belongs to the pose, and the prop history is dropped rather than making a sword from ten minutes ago disappear when you meant to undo a shoulder.
The chip and its rows
Without props the HUD looks exactly as it did - the chip appears in the character block only once something hangs on the character. It carries the count, and clicking it puts all of them out of the way for the moment.
Its flyout has one row per prop, in the same vocabulary as the pin chips:
| Row control | What it does |
|---|---|
| Dot | Hides this prop on this character. A property of the character, so it outlives the session |
| Name | Selects the prop for fitting - the usual Move / Rotate / Scale handles then work on it |
| × | Takes it off. On a shared assignment it goes from every humanoid rig |
Selection deliberately goes through the row: props are taken out of Unity's click picking, so a sword in front of the arm can never be grabbed instead of the bone behind it.
The fit belongs to the character
A fresh prop starts at the bone's origin, at the prefab's own scale rather than at 1 - a centimetre-scaled FBX would otherwise stand in the figure a hundred times too big. Pull it into place with the handles and the fit is stored for this character, even when the assignment is shared: the same sword sits right in a big hand and in a small one.
Renaming happens in the stage hierarchy and is taken over into storage. A name follows the assignment - shared name for everyone, local name only here - while the fit and the hidden flag always stay with the character.
A prop never produces a curve
Props cannot be picked in the Scene view, cannot be registered as a manipulated bone, and are never keyed. On the way into the stage, a prop's own Animator, legacy Animation and colliders are stripped: motion of its own laid over the pose is the one thing a prop must not bring along.
Two things do run on the clip clock nonetheless. A VFX prop's particle systems are simulated to the playhead instead of the wall clock - and a prop with a moving part of its own can follow it too.
Moving parts that follow the playhead
A bow's string is not animated by the clip that draws it: the string belongs to the weapon, the draw belongs to the character. Left to itself it hangs slack while the hand pulls at it, and the pose you are keying is exactly the one that looks wrong.
If the prop's prefab carries a component implementing IAWPlayheadDriven (see the Script Reference), its row gets a timeline chip. Switched on, the moving part stands where the playhead stands - while scrubbing, during playback and on every frame step.
Four things are worth knowing about it:
- Off by default, and switched per prop. Whether a part should follow depends on the clip you have open, so the answer lives in the session rather than on the character: a string follows the draw it belongs to and has no business creeping open across a walk cycle.
- Not following means at rest, not frozen. A part that does not follow is actively held at 0 instead of skipped - otherwise switching it off would leave a half-drawn string standing exactly where you stopped caring about it.
- Toggling re-samples on the spot, so you see the change while the playback stands still - which is the state the chip gets clicked in.
- Only props are driven. The same component on the character itself is ignored: what belongs to the rig has bones, and bones get keyed rather than driven.
:::note Lite & Pro Lite hangs one prop per character; in Pro there is no limit. Everything else on this page - fitting, hiding, renaming, following the playhead - is the same in both. See Lite & Pro. :::
Camera and view
| Action | Default |
|---|---|
| Cycle mesh / skeleton view | Ctrl+M |
| Toggle grid | Ctrl+G |
| Cycle camera focus | Ctrl+C |
| Reset camera | Ctrl+R |
| Play / pause | Space |
| Previous / next frame | Ctrl+Q / Ctrl+E |
| Previous / next keyframe | Ctrl+Shift+Q / Ctrl+Shift+E |
Mesh view cycling matters more than it sounds: on a dense rig the skeleton is easier to read with the mesh hidden, and the silhouette is easier to judge with it back on.
Posing onto a layer
With an Animation Layer stack, pose edits land in the active layer and are converted into that layer's space - so posing on an additive layer records the offset, not the absolute pose.
If the active layer is locked, muted or at a very low weight, the bone still moves but nothing is recorded, and the HUD names the reason.
Locked clips open read-only
A locked clip - one where you are viewing a version that isn't live, or a clip that lives inside an imported model (.fbx) - can still be opened in Pose Edit. The badge reads VIEW ONLY, and scrubbing, onion skin, motion trails and bone inspection all work as usual. Only the recording is gone: bones follow the handles, but nothing is written and the next re-sample snaps them back.
To pose such a clip for real, use Set Live on the version you want, or extract the clip out of its model as an editable .anim copy - Pose Edit offers the extraction when you enter.
Requirements
Pose editing uses the Animation Rigging package, installed automatically on first launch, and is designed for humanoid rigs. Generic rigs can be posed, but IK and mirroring depend on what can be resolved from the hierarchy.