Keyframe Editor
A standalone timeline and curve editor. Ctrl+Shift+K, from the browser context menu, or by right-clicking an .anim asset → Animation Workbench → New Keyframe Editor.
You can open as many windows as you like. One per clip is a normal way to work - it is how you compare two takes without losing your place in either.
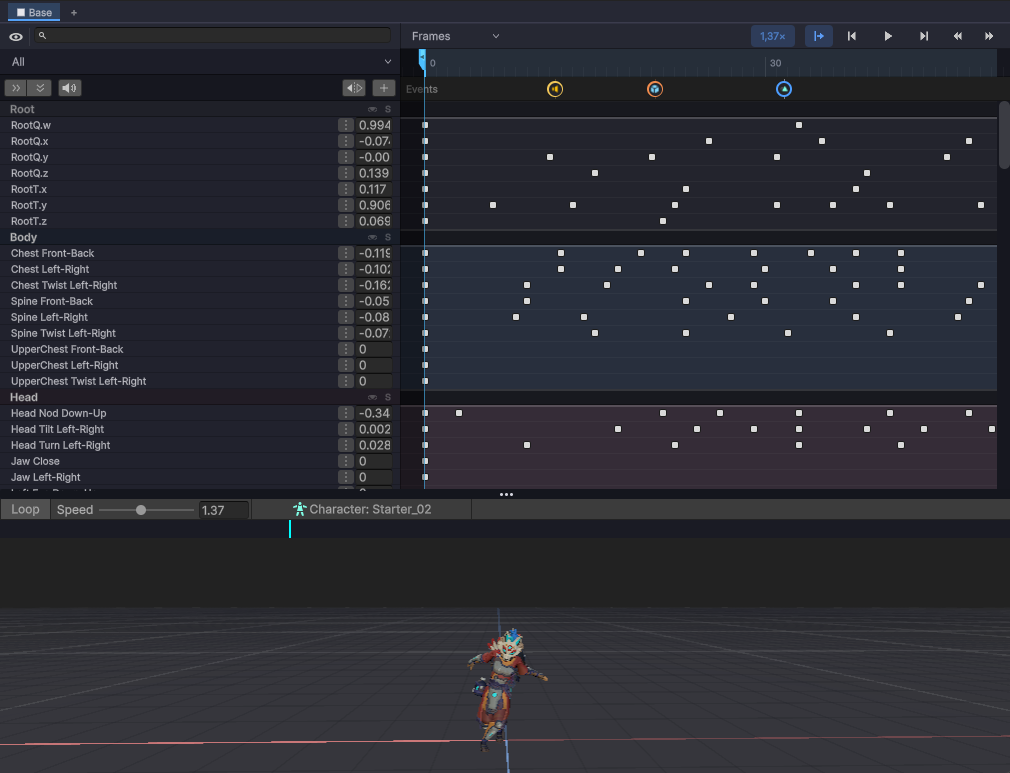
The two views
Dope sheet - keys as blocks on a timeline, grouped by track. This is where timing work happens: move, copy, retime, delete.
Curve view - the same keys as curves, with tangent handles. This is where the feel is fixed.
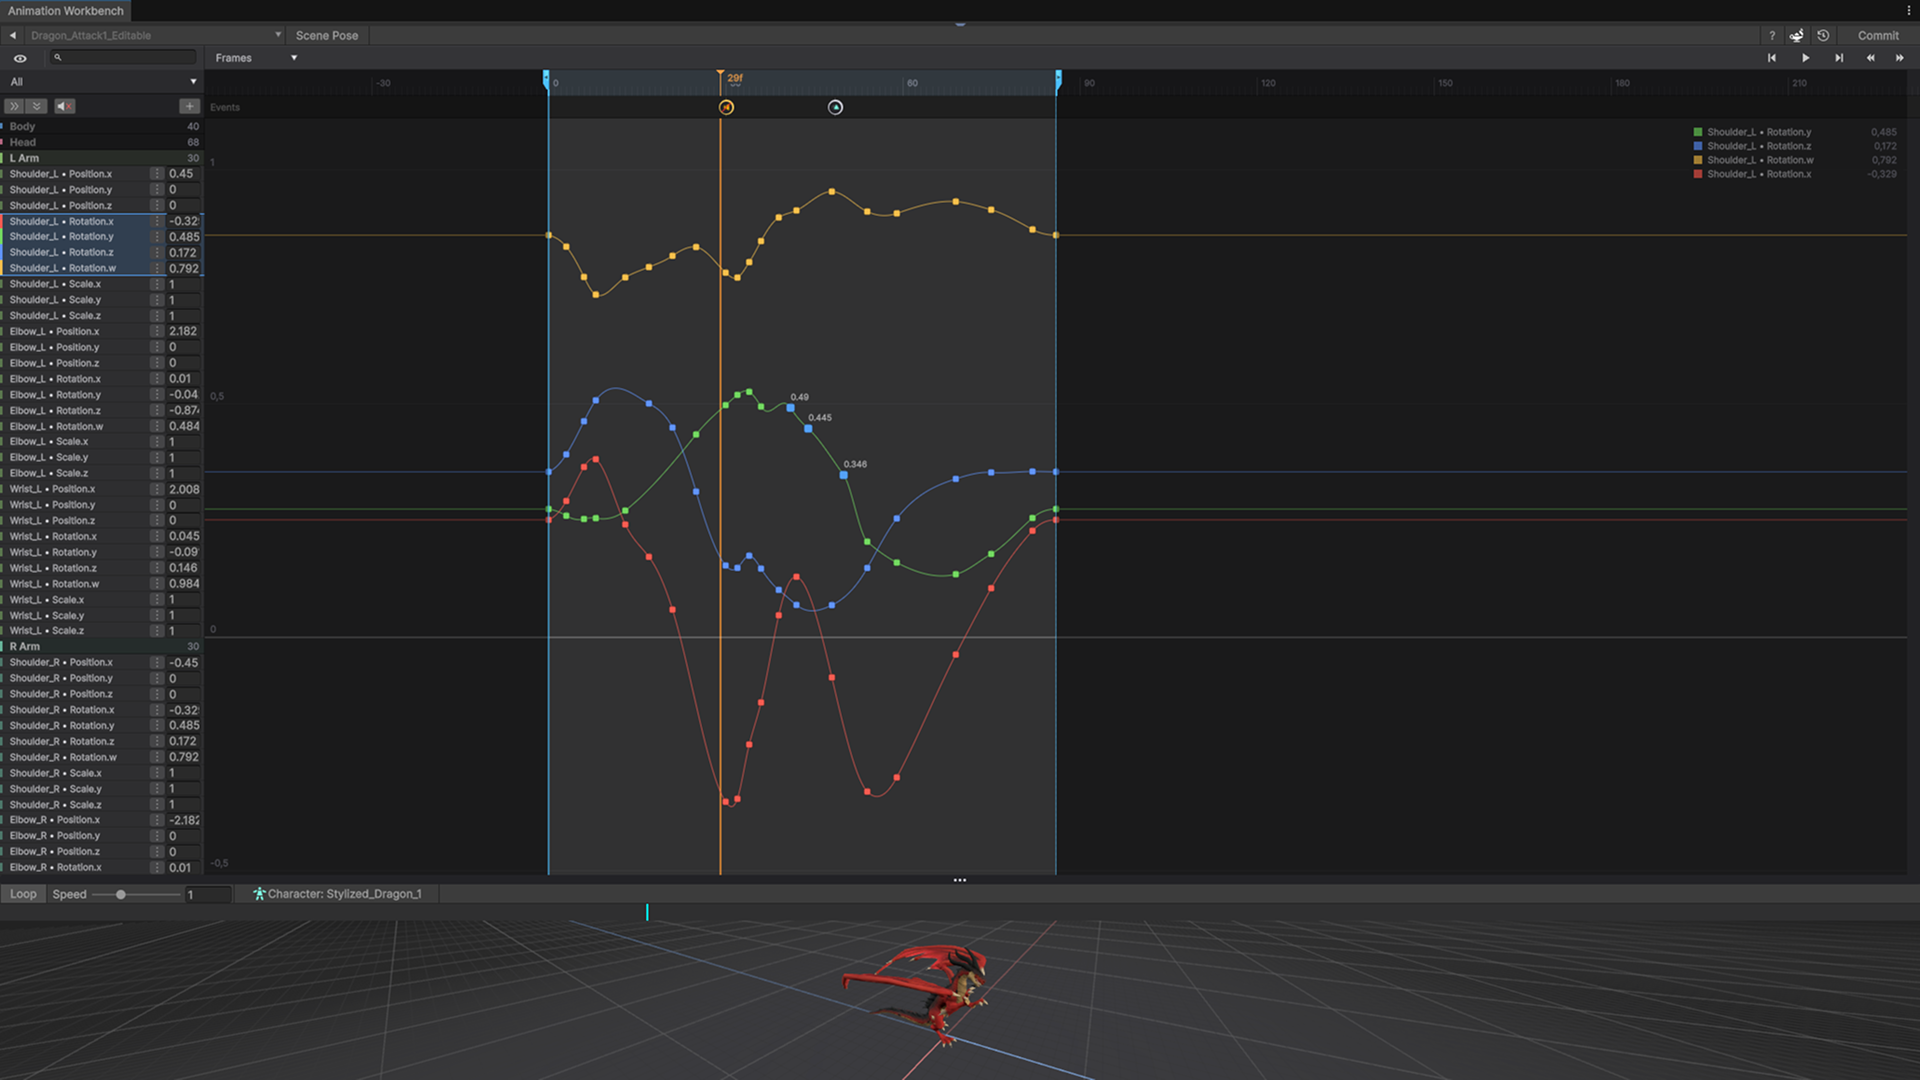
Track groups can be collapsed to get a rig out of the way, and muted to hear what the clip looks like without a limb. Both are remembered by group label, so they survive a rebuild or a character swap.
Editing keys
| Action | Default |
|---|---|
| Create keyframe(s) at the playhead | Ctrl+K |
| Delete selection | Delete |
| Copy / cut / paste | Ctrl+C / Ctrl+X / Ctrl+V |
| Paste at original times | Ctrl+Shift+V |
| Select all | F |
| Snap selection to grid | S |
| Undo / redo | Ctrl+Z / Ctrl+Y |
Paste comes in two flavours on purpose: at the playhead when you are moving a pose to a new moment, at original times when you are copying tracks between clips and the timing must not shift.
Values can be typed directly - inline float editing on a key beats dragging when you know the number you want.
Retiming
The retime tool scales and moves whole ranges of keys rather than individual ones. Combined with the edit range and loop range controls, that is how you make a 40-frame attack land on frame 18 instead of 22 without re-keying it.
Mirroring and reversing
Mirror keys flips keyframes across the character - left arm to right arm - for the current selection, from the key context menu.
Two clip-wide siblings live under Clip Actions, next to Add Property. Both edit the clip you are in (use Save As New Clip… first if you want to keep the original), both run across every layer at once, and both are one Ctrl+Z away from undone:
- Mirror Clip turns the clip around in space. Side-paired curves swap their binding, centre curves mirror where they are, and transform curves are mapped through the rig's rest pose - so a rig whose two sides carry different local axes mirrors correctly too.
- Reverse Clip turns the clip around in time: the last pose becomes the first one. Keys, tangents (including stepped holds) and animation events all move together, and the clip keeps its length - the window between the first and the last key is what the motion is reflected in, so reversing twice gets you back exactly where you started.
Reverse is the quick way to get a close out of an open - a sheathe from a draw, a land from a jump - as a starting point you then re-time rather than re-key. Two things it cannot do for you: audio events still play forwards, and sprite or material reference tracks are not part of the dope sheet's track model, so a clip that has them will say so before it runs.
Onion skinning
Ghosts of the previous and next frames behind the current pose. The classic use is arcs: if the hand's ghost trail bends where it should sweep, you can see it without scrubbing.
Animation Layers
Author the clip in stacked passes - a base, a lean on top, a hand fix above that - each with its own weight, blend mode and mask.
The strip sits above the dope sheet and is always visible. Full documentation: Animation Layers.
Events
A dedicated event track carries typed events:
- Audio events - a cue from the Audio Library on an exact frame
- Spawn events - prefabs (VFX, projectiles) with position and rotation options, previewed with gizmos
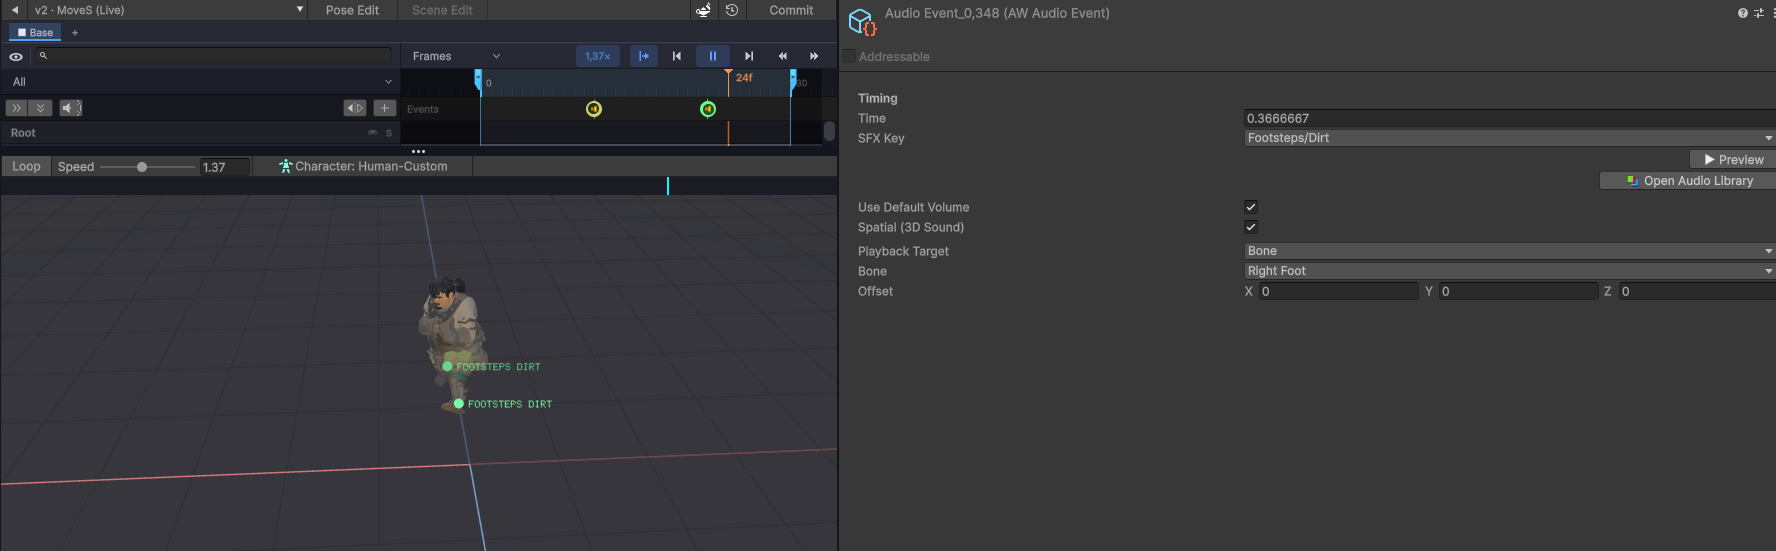
Selecting a chip on the event track puts the event into the Inspector, where it is a typed object rather than Unity's Function / Float / String triple: a cue key, a playback target - here the Right Foot bone, so the footstep follows the foot - an offset, and a Preview button that plays it without entering Play Mode. The gizmo labels in the preview below show where each event will fire from.
Events can be selected, dragged, duplicated (Ctrl+D) and multi-edited. Play-mode diagnostics show what actually fired.
Versioning
Ctrl+S saves a version, not just the file. Every save is a snapshot you can return to.
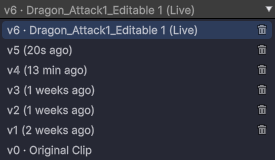
The version dropdown in the toolbar is the history - there is no separate panel to open. One entry is marked (Live), the one you are editing; everything under it is history with the time it was saved, down to v0 · Original Clip, the state before you touched anything. Picking an older entry loads it as a preview; editing it means setting it live first.
| Action | Default |
|---|---|
| Save version | Ctrl+S |
| Reload the active version | Ctrl+Alt+R |
| Reset editor | Ctrl+R |
Two things this buys you:
- The wilder take becomes worth trying, because Tuesday's timing is still there on Friday.
- A layered clip keeps its stack. The
.animfile always holds the flattened result; the unflattened stack lives in the version snapshot. Save a version to keep your layers.
A script recompile auto-commits a version first, so a domain reload never eats pending work.
Lite keeps the last 2 versions per clip, Pro keeps all of them - Lite & Pro.
Clip actions
Operations on the clip as a whole rather than on keys - creating a mirrored copy, extracting a range, and similar. They write a new asset instead of modifying the original, so the source clip is never at risk.
Posing from the editor
Two ways in, and the difference matters:
| Mode | Shortcut | Where you pose |
|---|---|---|
| Pose Edit | Ctrl+L | A temporary stage character |
| Scene Edit | Ctrl+Shift+L | A character in your open scene |
Scene Edit is for when context matters - a climb that has to line up with an actual wall, a pickup that has to reach an actual crate. Have the clip open, select the character in the scene, press the key.
You do not have to bring one yourself. With no usable character selected, the button reads Scene Edit + and places the clip's own character in the middle of your view - the same figure you get by dragging the clip into the scene. It stays there afterwards; Ctrl+Z takes it back out.
If nothing happens, the hotkey tells you why in the editor rather than failing silently: this clip has no character that fits, or Pose Edit is still running.
Both write keyframes back into the clip and never touch your prefabs. Details: Pose Editing.
Live preview
The editor previews as you scrub, and stays in sync with the scene. Playback is Space.
The standalone window has a 3D preview of its own under the timeline, with Character, Loop and Speed in its toolbar - the same preview the Workbench shows in its inspector. Each window picks its own character, so two editors side by side can show two different ones. The preview keeps running while Pose Edit or Scene Edit is active.