Animation Layers
Author a clip in stacked passes instead of one flat set of curves - a base motion, a lean on top, a hand correction above that - and keep each pass editable on its own.
What a layer is - and what it is not
A layer is an authoring construct that lives in the Keyframe Editor. It never becomes an AnimatorController layer, a separate .anim asset, or an AvatarMask.
The clip on disk is always the flattened composite. That is deliberate: your Animator, your runtime, Timeline and every other tool keep seeing an ordinary animation clip, with no dependency on Animation Workbench at all.
:::info Where the stack itself lives
The unflattened stack is stored inside version snapshots, alongside the flattened result - not in the .anim file.
Practical consequence: save a version to keep your layers. The clip alone can only give them back as one flat pass. A script recompile auto-commits a version for you, so a domain reload does not eat the stack. :::
See Clip versioning for how versions work.
The layer strip
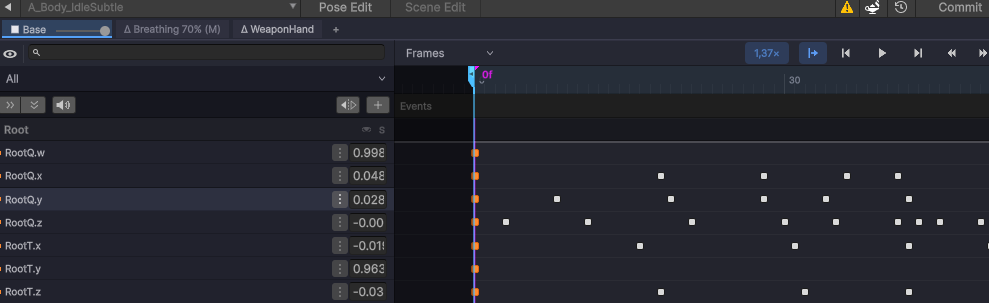
A chip row sits above the dope sheet and is always visible - even with a single base layer, so the button that creates your first layer never moves.
Chips read left to right in stack order: _layers[0], the base, sits leftmost, each new layer to its right. The + at the end adds a layer. Click a chip to make it the active layer; drag a chip to reorder.
The chip shows the layer's name, a weight readout, and glyphs for its state (M muted, S soloed, L locked, plus a mask indicator).
Per-layer controls
Right-click a chip for the full menu:
| Control | What it does |
|---|---|
| Weight | 0–1, dragged on the chip. How much of this layer reaches the composite |
| Override / Additive | How it combines with everything below - see the formulas below |
| Mute | The layer contributes nothing |
| Solo | With any layer soloed, every non-soloed layer goes silent |
| Lock | The layer stops receiving edits - pose edits land elsewhere |
| Set Mask | Restrict the layer to certain track groups |
| Rename…, Duplicate, Delete | Housekeeping |
| Merge Down | Fold this layer into the one below it |
| Flatten All | Collapse the whole stack into a single base layer |
How the composite is built
Bottom to top, per curve, where b is the value below, l the layer's own value and w its weight:
| Mode | Formula | Reads as |
|---|---|---|
| Override | b + w · (l − b) | Blend towards this layer's value. At w = 1 it wins outright |
| Additive | b + w · l | Add this layer on top. At w = 0 it disappears |
Additive is what you want for corrections - a lean, a limp, an offset that should ride on whatever is underneath. Override is what you want for replacements, like a different arm pass on top of a locomotion base.
Masks
A mask restricts a layer to a set of track groups - the same groups you collapse and mute in the dope sheet. No mask means the layer contributes everything it authors.
Masks are stored as group labels, not indices, so they survive a track rebuild or a character swap.
:::note Not an AvatarMask This is a dope-sheet concept, not a humanoid muscle mask. It filters which of your tracks the layer may write, and it exists only while authoring. :::
Ghost keys
The keys of the other layers, drawn faint behind your own. They answer the one question a stack keeps raising: "why does this bone move when my row is empty?"

Ghosts are pixels only. They cannot be clicked, box-selected, dragged or deleted - that is a deliberate limitation, not an oversight. Key editing addresses keys by index within the active layer, and a second set of clickable keys with different indices would silently reach into the wrong layer.
They are on by default, and switched off under Ghost Keys of Other Layers in the track filter menu above the dope sheet. That entry only appears once a clip actually has more than one layer - on a flat clip there is nothing to ghost. The setting is shared by every Keyframe Editor window rather than kept per window.
Posing onto a layer
Pose Edit writes into the active layer, and the edit is converted into that layer's space - so posing on an additive layer at weight 0.5 records the offset, not the absolute pose.
Recording is suppressed when the active layer cannot sensibly receive it:
| Situation | What happens |
|---|---|
| Layer is locked | The bone still moves in the scene, nothing is recorded; the next resample snaps it back |
| Layer is muted | Same |
| Layer weight is very low | Same - dividing the delta by a near-zero weight would record noise |
The scene HUD names the reason, e.g. "Layer 'Lean' is locked". This is standard DCC behaviour for a locked layer: you can still grab it, it just does not stick.
:::caution Humanoid body stabilization pauses on a stack While a clip has a non-trivial layer stack, the humanoid body-consistency bake is suspended. If you rely on that stabilization, do the pass on a flat clip or flatten first. :::
Mute changes what you save
A muted or soloed layer is a view, so toggling it does not go into the undo stack - otherwise a dozen view toggles would bury your actual edits. But it does change the flattened result.
Because of that, mute/solo state is tracked against a clean reference and you get a prompt at save time if the composite you are about to write is not the one you would get unmuted. Same mechanism as group mute.
Editions
Layers are a Pro feature in the sense of a size budget, not a locked door.
Lite gives you a real stack of up to 2 layers, base included. Everything works inside that budget: weight, blend mode, mask, mute, solo, merge, undo. The wall appears only at the layer that would exceed it - adding, duplicating or pasting a layer beyond the budget opens the upgrade dialog.
Reading is never limited. A stack built in Pro opens in Lite, the composite is built, and preview, scrubbing and thumbnails all work fully.
:::caution Editing a deeper stack in Lite is a one-way door Editing a clip whose stack exceeds the Lite budget asks once, per loaded clip:
'Clip' has 4 authoring layers. This version works with up to 2. Editing it here flattens them into the next version you save. Existing versions keep their layers, so Pro can always go back to them.
Choosing Flatten & Edit collapses the stack in the working copy. That is not undoable with Ctrl+Z by design - the way back is through the saved versions, which keep their layer payload untouched.
The alternative would be worse: editing the composite while silently keeping the old stack means the next open in Pro quietly restores poses from before your edits. :::
See Editions for the full Lite/Pro picture.